Growing Love-Our Garden Themed Week

But, killing plants….

When kids are out of school and all us parents are going crazy, I have found that having some sort of themed activity (here I go again) helps pass the time. I’ve done everything from space to farm animals. For this post, I’m focusing on gardens.

Pre-Covid (I.e. not this summer), I had a clear routine. On Monday we did the calendar and talked about the theme and did a craft. Our area always has (had) free summer movies for kids and cheap drinks and popcorn and that was our Tuesday and a craft. Wednesday, usually spent at the beach, Thursday, edible craft, and Friday is for a field trip (pre-Covid). Now, I am not perfect so sometimes this changed and frankly sometimes it didn’t happen. But, I try.

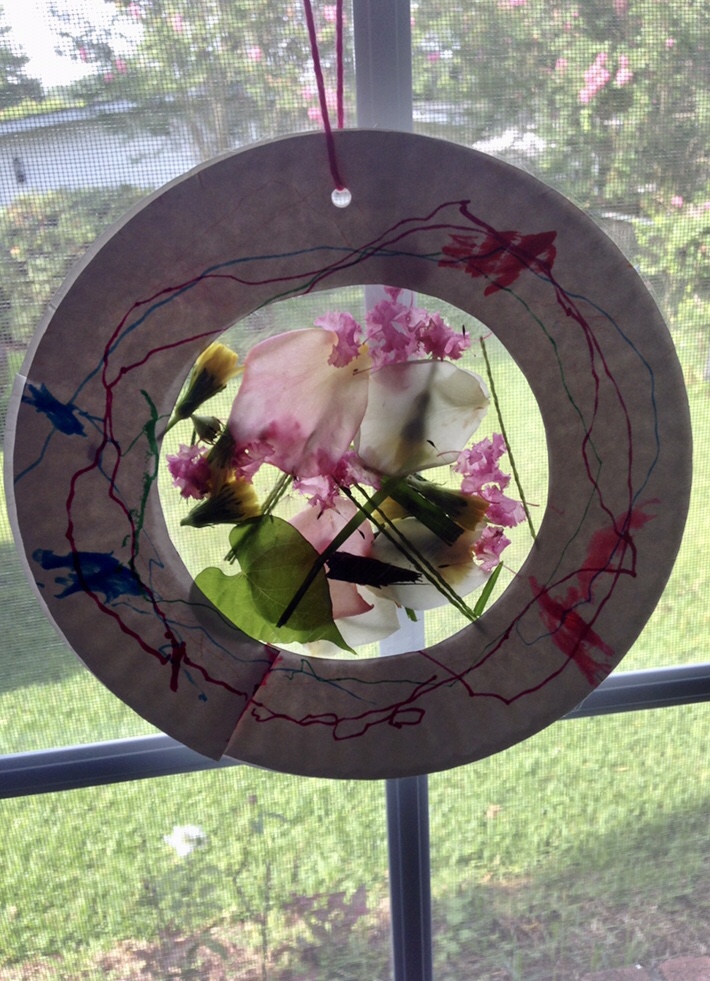
Ok, now that I’ve explained that, I’m focusing on our garden week. I did one craft and two edible crafts for our gardening week. The first craft was a flower sun-catcher. I used two paper plates (cut the center out, you will only need the outside ring), plastic wrap and flowers that we found outside while we were playing. Flowers go in between the plastic wrap and then the two paper plates are glued together around it. I also let them decorate it.

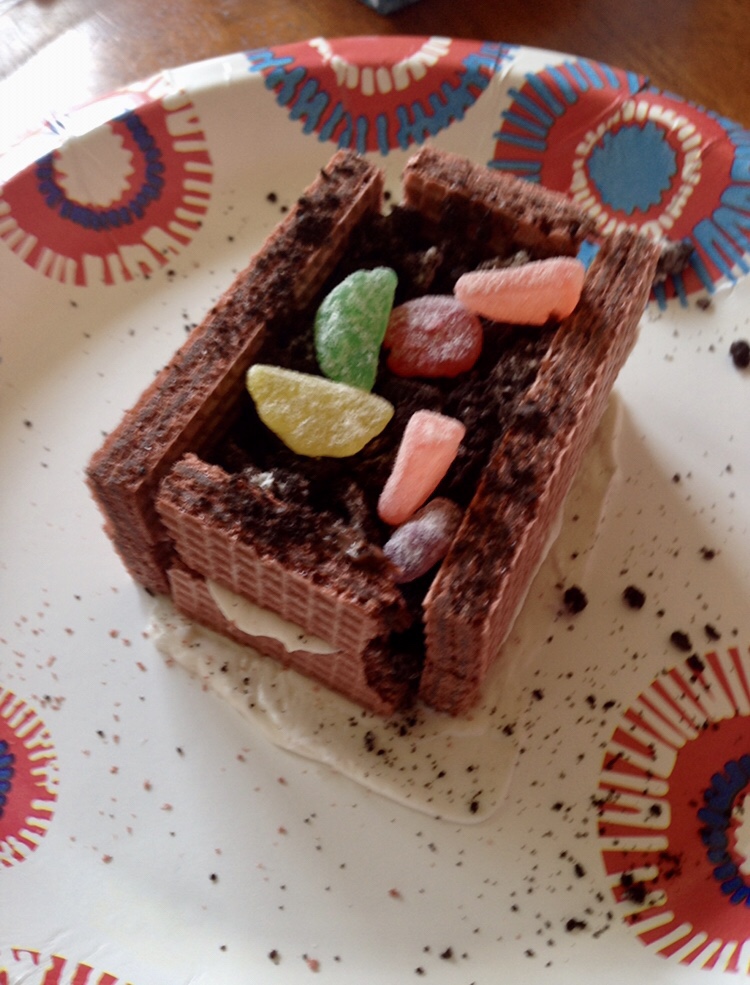
The next thing we did was an edible garden bed. For this we used chocolate wafer cookies, royal icing to glue the bed together, pudding, crushed Oreos, and sour patch fruit candy. Everyone thought it was really tasty.

Garden Bed

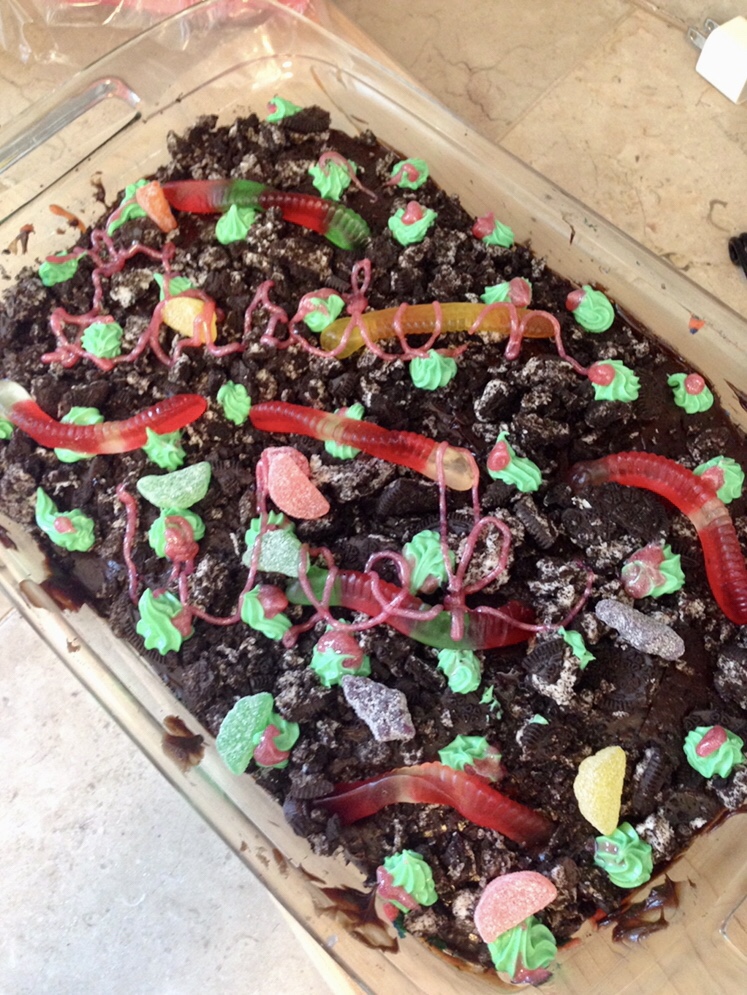
The last craft we did was similar, we made a garden patch. We baked a cake, used the rest of the pudding as the next layer, crushed Oreo dirt, icing for greens, the rest of the sour candy (I might have nibbled) and gummy worms. We were all happy with this too! I got too artsy and tried to write, “garden week” in pink…ummm let’s not talk anymore about that.

Our field trip was Brookgreen Gardens. If you’ve never been, you NEED to go. It is Heaven on Earth and we go a lot. Here’s some INFO and a short tour from one of our visits. It was the perfect ending to a great week.

Do you create theme weeks for your kids? It really is fun. Enjoy!

“P” Is For Pancake

“P” is also for panic, patience, poop…AKA parenting!

I’ve slowly been working P up to doing some real cooking…things that even some adults can’t do. Pancakes! Scratch pancakes to be exact. She did every step…from cracking the egg to flipping pancakes for the first time. Very proud mom here! Pardon me while I go cry in the corner over my little grownup.

Pancakes from scratch are, in my honest opinion, very easy to put together. My tips for really good pancakes are adding vanilla, always using buttermilk, and adding melted butter at the end of your mixing. I’m telling you…you will always make them from scratch after this. Even my dad (who is king of cooking) asked for this recipe!

I have to say that this recipe would be perfect to top with our HOMEMADE BUTTER and you can use the extra liquid as the buttermilk. No waste! Enjoy!

Buttermilk Pancakes

1 cup flour

1 teaspoon baking powder

1/2 teaspoon baking soda

1 tbsp sugar

1 cup buttermilk

1 teaspoon vanilla extract

1 egg

3 tbsp melted butter y’all!

Directions:

1) Mix the dry ingredients in a bowl.

2) Add the wet ingredients (except butter…add the butter very last) and mix until just combined.

3) Add melted butter until combine.

4) Use a griddle or non stick pan at medium low heat. I like a griddle for time saving reasons. You know you’re ready to cool if you flick cold water on the griddle and it sizzles.

5) Pour a 1/2 ladle of mix in the griddle (for smaller pancakes) and LEAVE IT BE until you see bubbles forming AND popping and the edges look waxy.

6) Flip and let it be for about a minute.

DONE! How easy is that?!

We got it down on the third attempt! Go P!

*If you like a pancake like the ones I have in the picture add about a 1/4 cup more of buttermilk. Personal preference here folks.

*If you’re buying buttermilk do it on a week where you plan to make ranch dressing, biscuits, or a cake so it doesn’t go to waste. I will say it lasts a good while.

Rainbow Butter- From Scratch

Everything’s better with butter y’all….

Homemade Rainbow Butter

I am a firm believer that if a child helps you make food they will want to eat it more. Anyone else? I try to get P involved with cooking on a regular basis and she really loves it. We’re at the point that she can make homemade ranch 99% on her own including tasting and adding seasoning to taste. I say 99% because she will absolutely NOT touch mayo (insert my weekly eye roll).

For this cooking adventure we made homemade butter but I couldn’t stop there…we had to make it pretty. Naturally, that means a little girl will want to make it a rainbow. I mean, I wanted to make it rainbow as well because I like pretty things too! Here’s the really nice part about butter…YOU DON’T HAVE TO MEASURE ANYTHING! You heard it here! It’s the easiest recipe ever.

All you need is heavy cream, salt, and food coloring. We use a mixer to make ours but you can also shake the heck out of it in a mason jar. I’m lazy so I opt for the mixer. If you’re more into how to videos you can watch us make it HERE.

Here’s what we used, plus salt

You may notice I used the whisk attachment…my dad (who is ridiculously smart) said a paddle attachment would be more authentic and possibly separate the buttermilk (left over liquid) from the butter. Your choice, folks. Alright, so here we go.

Ingredients:

Heavy Cream (I used approx. 4 cups)

Salt

Gel Food Coloring

Directions:

1) Pour in heavy cream…I used about a cup per color.

2) Start whisking on high.

3) Add a pinch of salt to taste and food coloring to your level of liking. I recommend using gel food coloring for a more vibrant color.

4) Whisk like heck. It will turn into whipped cream. Don’t stop there…keep whisking until the liquid separates from the solid. It will look like a mess (that’s how you know you’re there).

5) Use a fine mesh strainer to separate. You can save the liquid to make pancakes or biscuits!

6) Use your hands to shape the butter while squeezing out any further liquid.

7) Rinse with cold water then set in a bowl or container.

8) Repeat above steps for however many colors you are using. We used red, blue, yellow, and green.

9) Lay out a piece of cling wrap and spread the butter into a rectangle. Add the other colors one at a time on top of each other. Fold the wrap closed tightly and put in the fridge. Once the wrap is closed you can further shape it. Again, you can WATCH HOW TO MAKE RAINBOW BUTTER HERE.

10) Enjoy your beautiful, colorful, delicious butter on whatever your heart desires!

Oh Em Geeeee

Here’s just a few tips. You can flavor your butter any way your heart desires. So, if you’re using it for pancakes, add some vanilla and sugar during the whipping process. Want it on a juicy steak? Add some garlic and fresh herbs. Flavored butter on biscuits? How about some apricot preserves mixed in?!?! I’m drooling!